Scheduling System>
Master Schedule Builder
Using
the Master Schedule Builder (MSB)
Define
MSB Parameters
There are
four (4) areas where parameters are be defined that affect the processing of
the Master Schedule Builder, Course Details, Rank Courses, Teacher Constraints
and Assign Teachers/Rooms.
I. Course
Details.
Þ Select <Scheduling
System> <Course Catalog> <Course Details>.
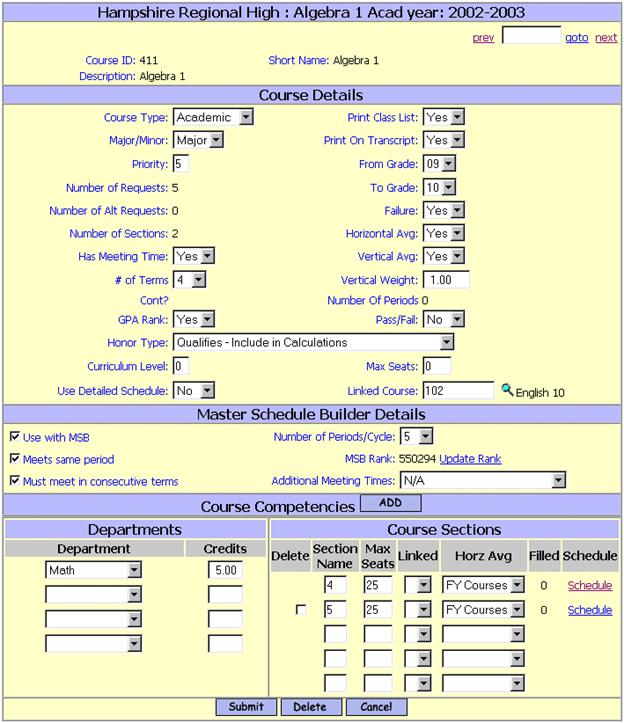
Course Details
Several fields in this section need to be defined
correctly in order to schedule sections of this course using the MSB and/or to
have the course properly ranked for use with the MSB.
Priority:
The Scheduling Priority determines when in the
scheduling process this course will be placed or where it will be ranked. It is a key factor in determining the Ranking
value of the course for use with the MSB.
It is also a key factor when you run the Student Scheduler.
One (1) is the highest value. Courses with a Priority of one (1) will be
scheduled or attempted before any other courses.
The Priority can be set to any value. A range of 1-99 is recommended. Five (5) is the default value.
Þ Accept the default values of
(5).
Þ Select a higher or lower
value to define the Scheduling Priority for this Course.
Has Meeting Time:
Þ Select Yes
if you want this course to be scheduled into one or more Period/Day meeting
times.
Þ Select No if you do
to want to define a meeting time for this course. You may still define a Teacher, Room and
Terms and be able to grade students in courses that do not have meeting
times. Course with no meeting time will
not be processed in the MSB.
Terms:
The number of Terms is a factor in determining the
Ranking value of the Course for use with the MSB.
Þ Define the number of Terms
that this course will meet during the school year.
Master Schedule Builder Details
It is assumed that you have set the “Use MSB Fields”
value to “Yes” in Step #3 – <Academic Year Settings>.
Use with MSB
Þ Check the box to Use this
course with the Master Schedule Builder.
Þ Do not check the box if you
plan to delete this course or manually schedule this course.
Meets same Period
This feature is used when the MSB is run without
manual intervention. This option has
not yet been implemented.
Þ Check the box if you want
this course to meet in the same period everyday that it will be scheduled.
Þ Do not check the box if the
course can meet in different periods on different days.
Must meet in consecutive terms
This feature is used when the MSB is run without
manual intervention. This option has
not yet been implemented.
Þ Check the box if you want
this course to meet in consecutive terms.
Þ Do not check the box if the
course does not have to meet in consecutive terms.
Number of Periods/Cycle:
The number of Periods per Cycle is a factor in
determining the Ranking value of the Course for use with the MSB.
Þ Enter the number of periods
that the course will meeting during your rotation
cycle.
MSB Rank:
The Rank is a calculated value. The lower the Rank the
higher the priority for the course to be scheduled.
The six-digit number is determined as follows: ABCDEF
A = the priority of the
Course
B = 9 minus the number of
Terms
CD = the number of sections
EF = 99 minus the number of
periods/cycle
Update Rank
Þ Click on the link to
re-calculate the MSB Rank for this course.
Be sure that you have submitted any changes before you re-rank the
course.
Additional Meeting Times:
This field is referenced by the MSB to locate an
extra period for a course that meets more than one period each day. This feature is used when the MSB is run
without manual intervention. This option
has not yet been implemented.
Select the default N/A to ignore this
feature.
Þ Select Either Period Before or After to have the MSB select extra periods
either before or after the primary period.
Þ Select Period Before to
have the MSB select extra periods only before the primary period.
Þ Select Period After
to have the MSB select extra periods only after the primary period.
Þ Select Anytime to
have the MSB select extra periods at anytime in the matrix.
Course Sections
Add/Modify/Delete Sections in order to have the
correct number of sections that you expect you will need at this time based on
student course requests and staffing.
The number of Sections is a factor in determining the Ranking value of
the Course for use with the MSB.
Run
Master Scheduler Builder
Þ Select <Scheduling
System> <Master Schedule Builder>.
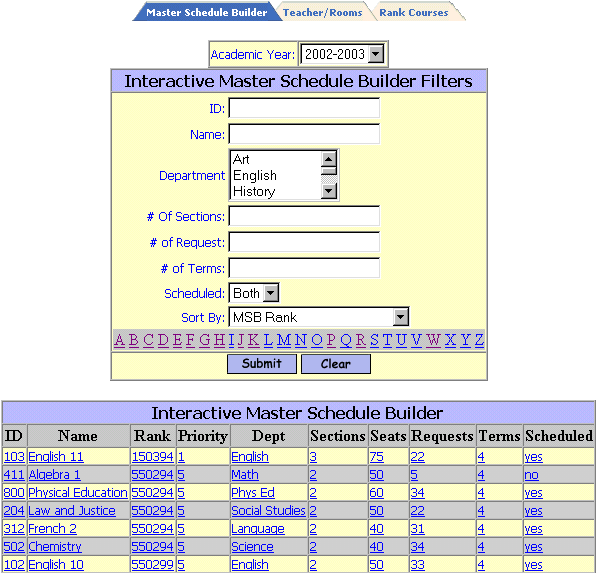
Select a Course
Þ Select a Teacher from the
filtering page.
Þ Sorting Options:
MSB Rank Department/MSB
Rank
Course ID Department/Course
ID
Course Name Department/Course
Name
# of Sections # of Requests
# of Terms Priority

Generally, you would select the period with the
fewest number of conflicts.
Þ Select a Section to be scheduled
from the pull down list.
Þ Select the meeting times for
this section.
Þ Click the period name to
assign the section to meet everyday.
Þ Click on the number of
conflicts for Day 1 – Quarter 1 for the selected period to assign the section
to meet everyday for the 1st Term only.
Þ Click on the number of
conflicts for Day 1 – Quarter 1 and Day 2 – Quarter 2 for the selected period
to assign the section to meet everyday for the 1st Semester only.
Þ Click the check-box to
assign individual meeting times. Uncheck
any assignments you wish to cancel.
Reference Links
There are many links within the program that allow
you to reference or modify data that is relevant to your decision making.
Course ID and Name
Þ Click on the Course ID and
Name at the top of the page to access <Course Details> to view or edit.
Requests
Teacher Schedule
Room Schedule
Assign Teacher/Room
This link will appear, if you have not yet assigned
made a Teacher/Room assignment for this section.
Course-Section
#
This link will appear for any sections that are
already scheduled.
Bucket
Fill Section
The “bucket fill” process will fill the first
section up to its Max Seats value, if possible, then Max fill the second
section and so on.
Example: Course has 3
sections, Max seats = 25/section, total requests =60. With bucket fill, Section 1 gets 25, Section
2 get 25, Section 3 gets 10. With
balancing each section get 20 students, ideally.
Þ Check this box if you wish
to “bucket fill” each section.
Þ Do not check
this box if you wish the program to balance load the sections.
Without “bucket fill”, the program will attempt to
balance the number of students in each section selecting students based on
their priority (scheduling difficulty).
Color Codes
Some periods may appear with colors to indicate
constraints.
Red = Teacher is unable
to teach this period:
Yellow = Teacher has a
conflict this period:
Orange = Room has a
conflict this period:
Þ
Click ![]() to schedule this section.
to schedule this section.
Helpful Hint!
1) It is possible that not all students will be
scheduled when the last section of a course has been scheduled. Check the list of Requests to determine if
any students are still not scheduled. You
can click on the student ID to open their <Modify Schedule> page and hand schedule them or modify their requests.
2) If you are balancing sections, then it is
possible that un-scheduled students may fit into a section that was not open to
them earlier in the process.
3) When you have completed the process, all students
are as fully scheduled as possible and you do not need to run the Student
Scheduler program.
Not
Using the Master Schedule Builder (MSB)
Build/Adjust Master Schedule manually
Reports are the key to building a Master Schedule,
either from scratch or by adjusting an existing schedule. The use of a Scheduling Board is recommended
as a tool to help you visualize constraints, conflicts, teacher loads and other
problems.
Reports
Þ Select <Scheduling
System> <Scheduling Report>.
The following reports, in alphabetical
order by title, are specific to
<Class Lists>
Used to list the student scheduled
into each class for the Term(s) selected.
Filter By: Academic Year, From/To
Course-Section, Term, Grade Level, Day, Period, Teacher, include Phone #,
include SPED flag.
Sort By: Teacher (program-defined).
Output: Header: Teacher, Course,
Room, Term, Schedule. Body: Student ID,
Name, YOG, Gender, Homeroom, Phone # (by option), SPED flag (by option), Footer: # of Males,
# of Females, Total # of students.
Helpful Hint!
When selecting From/To Course-Section for this
report or others with this filter option, you may:
1) Leave the From/To Course ID fields blank to get
Class Lists for ALL courses.
2) Enter a single From Course ID without a section
and without a To Course Id to get lists for all sections of the Course.
3) Enter a single From Course-Section ID to get a
single class list.
4) Enter a From Course ID, without section, and a To
Course ID, without section, to get class lists for ALL Courses in that range,
inclusive.
NOTE: Entering a From
Course-Section ID and a To Course-Section ID will not get you every section of
every course within the range.
<Conflict Matrix>
Used to: determine the number of
conflicts (common requests) between one course and any other.
Filter By: one (1), two (2) or no
courses. Enter no Course Id and your
report will include all courses with all conflicts. Enter one (1) course and get a report of all
of the other courses that have conflicts.
Enter two (2) courses and get a single line report of conflicts.
Sort By: Course ID or Course Name.
Output: Header: Course ID, Course
Name, Number of Sections and # of Requests.
Body: Course ID, Course Name, # of Combined Requests. # of Sections and # of Requests.
<Course Request Tally>
Used to determine the number of
sections of a Course that may be needed by showing how many students in each
YOG are requesting the selected Courses.
Also to identify any data entry errors.
Filter By: Academic Year, Department,
a single Course or a range of Courses, YOG or Include courses with no Requests.
Sort By: Course or Department.
Output: Course ID, Course Name,
Department, # of Sections, Maximum number of seat (total in all sections) and #
of students requesting each Course by YOG.
<Drop Add Report>
Used to determine the students who
have been dropped from or added to Courses. This report includes changes to requests and
scheduled courses. It does not yet
include changes based on term modifications of individual students.
Filter By: Academic Year, From/To
Date, Student ID#(s), From/To Course, Teacher, Homeroom, Grade
Level.
Sort By: Teacher Name, Date of
Change or Course.
Output: Teacher, Date Student ID,
Student Name, Course ID, Grade Level and if the change was an Add or Delete.
<Master Schedule>
Used to list all courses in the
Master Schedule.
Filter By: Academic Year, Term,
From/To Course.
Sort By: Course ID, Teacher, Room,
Course Type, Period or Department.
Output: Course ID, Course Name,
Credits, Max Seats, Filled Count, Terms, Teacher, Room and Schedule.
<Names of Free
Students>
Used to: determine the names of
students who are not scheduled into courses for selected Terms and/or Periods.
Filter By: Academic Year, Student
ID(s), Homeroom, Grade Level, Term, Period, Counselor or Include Incoming
students.
Sort By: Period, Grade Level, Name
or Homeroom.
Output: Student ID, Name, Homeroom,
Grade Level, Term, Period and Days.
<Number of Free
Students>
Used to: determine number of
students who are not scheduled into courses for selected Terms.
Filter By: Academic Year, Grade Level,
Term.
Sort By: Grade Level/Term
(program-defined).
Output: Course ID, Course Name,
Number of Sections and # of Requests.
<Room Availability>
Used to: determine which Rooms do
not have courses scheduled into them for selected terms.
Filter By: Academic Year, Room and
Term.
Sort By: Room Code or Room
Description.
Output: Room Code, Room
Description, Used as Homeroom, Capacity, Term and Days Free.
<Room Schedules>
Used to: determine the schedule for
the use of the Room.
Filter By: Academic Year, Schedule
Type (Period, Summary, Rotation), Room, Term (ignored
if Summary Type is selected) or Department.
Sort By: Room.
Output: Room schedule.
<Student Availability>
Used to: determine the names of
students who are not scheduled into courses for selected Terms and/or Periods.
Filter By: Academic Year, Student
ID(s), Homeroom, Grade Level or Term.
Sort By: Grade Level, Name or
Homeroom.
Output: Student ID, Name, Homeroom,
Grade Level, Term, Period and Days.
<Students Requesting a
Course>
Used to: determine which students
have requested which Courses.
Filter By: Academic Year, Department
or From/To Course ID.
Sort By: Course ID/Student Name,
Course ID/ Student Grade Level/Name, Department/Course ID/Student Name or
Department/Course ID/Student Grade Level/Student Name.
Output: Header: Course ID, Course
Name and Department. Body: Student ID,
Name, Homeroom, YOG, Gender and Grade Level.
Footer: Total Males, Total Females and Total Students.
<Student Schedules>
Used to: determine the schedule of
the student.
Filter By: Academic Year, Schedule
Type (Summary, Period, Rotation, Mod, Period & Summary or Rotation &
Summary), Student ID, Student Last Name, Homeroom, Grade Level or Term(ignored if Summary Type is selected).
Sort By: Grade Level, Homeroom or
Name.
Output: Student Schedule.
<Teacher Availability>
Used to: determine the names of
teachers who are not scheduled into courses for selected Terms.
Filter By: Academic Year, Teacher,
Homeroom, Department or Term.
Sort By: Teacher Name or Homeroom.
Output: Teacher ID, Name, Homeroom,
Term and Days/Periods.
<Teacher Schedules>
Used to: determine the schedule for
the Teacher.
Filter By: Academic Year, Schedule
Type (Period, Summary, Rotation or Mod), Teacher, Homeroom, Grade Level or Term
(ignored if Summary Type is selected).
Sort By: Department or Teacher.
Output: Teacher schedule.
<Unscheduled Requests>
Used to: determine students who have
requested Courses that have not yet been scheduled.
Filter By: Academic Year, Student ID,
Student Last Name, From/To Course, Homeroom or Grade Level.
Sort By: Grade Level, Homeroom or
Name.
Output: Student ID, Name, Homeroom,
Gender, Grade Level, Course ID and Name.
Define
the Master Schedule
Þ Select <Scheduling
System> <Course Catalog> <Course Schedule> or from <Course
Details>.
Þ Select the Course-Section
you wish to Schedule.
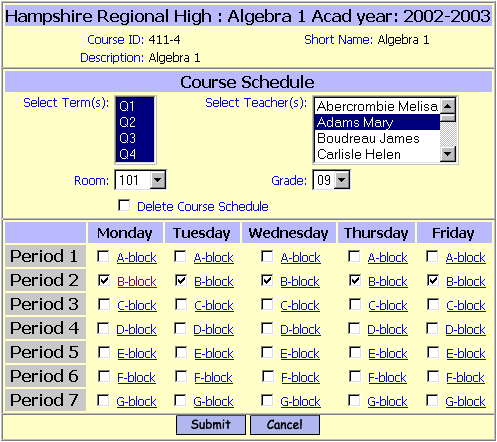
Select Term(s):
Select Teacher(s):
Room:
Grade:
Delete Course Schedule:
Helpful Hint!
If you checked Yes for “Use Detailed Schedule” (See Step #8) on
the Course Details page, then the options described above will need to be
defined for each Period/Day that the course meets.